
How to make your own DIY storage box and transform cardboard boxes

How about a fun home craft idea that doesn’t make mess and clutter, it gets rid of it! Read on to find out how to make a quick DIY storage box, or two, or three…
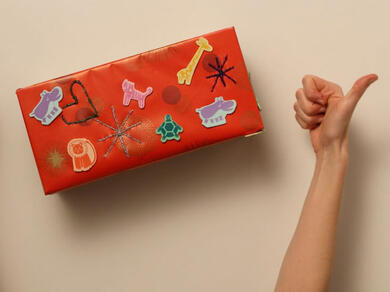
A DIY craft project to get your storage sorted

Sometimes it feels like family life needs a little reboot, when it’s time to to do something impressively wholesome together, like a DIY craft project. If that sounds like too much hard work, don’t worry, we’ve got this covered! We’ve got the best ideas, the essential kit and the step-by-step instructions. DIY crafts ideas are a great way to develop your child’s creativity, problem-solving skills and even their resilience - if things don’t always go to plan - which they often don’t! It’s one of the best ways to spend quality time together without getting on each other’s nerves. Everyone gets some time away from their screens without feeling bored and you get to be creative together, chatting and having fun along the way! As the kids make a wide range of projects, they’ll get familiar with lots of materials, from cardboard to fabric, and today’s kids love being able to reuse and upcycle common household items too. Once they’re finished, they’ll have made something special that they can use themselves at home or give as a gift - and you’ll be a clear candidate for world’s best parent!

Make your own DIY storage box

If you like a neat and tidy home, we think we’ve found the perfect DIY art and craft project for you. A lot of DIY craft activities can end up contributing to the clutter around our homes. So, iIf you’re on a mission to declutter and tidy your home, but you still want to get creative with your kids, you need a project that will help to solve the clutter problem, not make it worse. Good storage is the secret to a tidy home so a DIY storage box is the perfect project to help conquer the clutter. Kids can make these boxes as a gift for another family member – somewhere to store fabric for sewing, outdoors kit,  a grab-and-go toolbox, or storage for hair accessories.  Make a list of all the problem areas around the home and use a DIY storage box for each of them – it might be somewhere to store greetings cards, stamps and your address book, or just those little random bits of plastic, wood or cabling that you don’t know where else to put. Kids will love to keep the boxes for themselves too – as a box for their dolls, dinosaurs or special treasures - and as an inspiring way to get organised with their paint, pens and craft supplies – the list goes on and on…

Beautiful boxes, how to get started with our quick craft guide…

With our step by step, easy-make tutorial and Bostik’s simple-to-use products, kids can have fun while they make their own creative DIY storage box project…

Instructions

Step 1: Assemble your kit

For this DIY make, you’ll need to use a cardboard box or boxes (shoe boxes are best), a selection of wrapping paper, scissors (suitable for kids or for use by an adult), foam shapes or other decorative images and home glue products like Glu stick, Blu Glu stick and Glitter Glu.

Step 2: Calculate your paper needs

Lay out your wrapping paper, then rotate the box across the paper so that you have enough for each side, plus a few centimetres spare.

Step 3: Cut your paper to size

Use your hand as a marker then, using your scissors kid’s proof, trim the paper down to the correct size for the cardboard box, leaving a little spare.

Important:

When cutting the materials for this DIY storage box make, please do ensure kids are supervised to use scissors. If necessary, an adult should use the scissors on the child's behalf.

Step 4: Glue the base in place

Apply Glu stick to the base of the cardboard box, with firm, even strokes, and press it into position on the wrapping paper.

Did you know?

Glu stick has an ergonomic shape so it’s easy to use with a simple, clean application, making it the best choice for avoiding sticky fingers. It’s a washable glue, made of 93% biobased ingredients, so it’s a good choice for the family and the planet. With at least 75% recycled plastic stick, it comes with zero plastic, 100% carton packaging, helping you to say no to unnecessary plastics in your home and your life.

Step 5: Wrap your box

Using your scissors, while alway ensure kids are supervised, trim the wrapping paper down to create four tabs to cover each of the four cardboard box sides, plus a few centimetres spare. Then apply Glu stick to the two tabs for the longer sides of the box, with firm, even strokes and press them onto the box, tucking the extra over into the inside of the box. Repeat for the two shorter sides of the box and allow to dry.

Up level your storage

Take your box storage to the next level by creating a whole series of boxes, choosing a variety of papers in the same colour palette; it could be soft pastels, primary brights or a tonal mix such as pink, lilac and purple. Make simple labels - using the same colours - so you don’t lose track of what is stored where.

Step 6: Create a lid

Use a sheet of wrapping paper with a contrasting colour or pattern to wrap the lid of your storage box, following the same steps.

Tip:

Glu stick is the best choice for kids’ home DIY crafts, because it is easy-to-use and the glue has been formulated to be washable, so accidental messes are easy to clean up. Please ensure the adhesive is washed off with water before it sets.

Step 7: Personalise your box

Choose some foam shapes, or other decorative images, and apply Blu Glu stick to the back of each shape, using firm, even strokes, then press into place on your storage box lid and allow to dry.

Did you know?

Blu Glu stick is easy to use with an ergonomic shape and a simple clean application, just like Glu stick. But Blu Stick goes on blue so you can see exactly where you're sticking, then dries clear, for a perfect tidy finish. It’s great for any DIY make or craft project involving paper-based materials, where it’s helpful to see precisely where to apply your adhesive. Like all the products in the Bostik stationery range, Glu stick features a 100% recycled plastic tube and zero plastic packaging that’s 100% carton, made using recycled and recyclable packaging – helping you to say no to unnecessary plastic in your home and your life.

Tip:

When you’ve finished using your Glu stick or Blu Glu stick, retract the glue by turning the base anti-clockwise, and replace the cap. That way it’ll stay perfect for your next craft project.

Step 8: Use glitter glue to add some finishing touches

Take the top off a Glitter Glu and squeeze gently, then spread the glitter glue precisely where you want it on your storage box – try adding hearts, football items, animals or zig zags for a funky finish.

Did you know?

Glitter can be very messy to use for crafts and decoration ideas and continues to shed, long after your craft project is finished – not great for a storage box. But with Glitter Glu, the flakes of glitter are cleverly suspended inside a clear glue and the precision nozzle allows you to apply the glitter in exactly the right places. It’s the best way to add some easy sparkle to your DIY storage box, without mess.

Step 9: You’re done!

And that’s it, you’ve created a brilliant DIY storage box – something fun, personal and very practical! Well done.

Time for another craft project?

Bostik offers a wide range of stationery and craft adhesives, so no matter how complicated your next craft project may be, there's a stationery glue at hand to help.

Plus, if you're looking for some craft inspiration, you can browse our blog and filter #CraftWithBostik for all Bostik arts and crafts ideas.

See all products